


Description
HDMI Wall plate 4K HDBase-T extender 18G is a wall plate transmitter and a receiver. The extender is designed to transmit HDMI (1080P, 4K@60Hz 4:2:0), RS232 and USB signal up to 328ft/100m away by using a signal CATx cable.
The wall plate transmitter features two HDMI inputs, and one of them can be selected as the input source by the SOURCE/AUTO button on the front panel. It also features Type-B USB port to connect a PC or other device which needs to be controlled by the far-end HID devices (e.g. mouse, keypad and so on), which are connected to the Type-A USB input ports of receiver. The transmitter supports CEC: the DISPLAY ON/OFF button on the front panel is used to control the far-end display device, and it can be programmed by RS232 command to ensure the compatibility with various display devices. Moreover, 24V POC allows the transmitter can be powered from the receiver, and the transmitter has 12V DC output for powering other device.
Features
- Supports HDMI signal up to 4K@60Hz 4:2:0.
- HDMI 1.4 standard and HDCP 2.2 compliant.
- Automatically detect active input when source is connected.
- HDBase-T technology extends HDMI, USB and RS232 signal up to 328ft/100m over CATx cable.
- Supports bi-directional RS232 pass-through with HDBase-T connection and local control.
- Supports CEC to turn on/off display by the DISPLAY ON/OFF button.
- Ensures display of content-protected media and interoperability with other HDCP compliant devices.
- Supports 24V POC wide range, the transmitter can be powered from the receiver by the CATx cable.
- Provides 12V power supply for other device like WP series Control Panel.
- Firmware upgrade by Micro-USB port.
Specification
Transmitter
| Input | |
| Input | (2) HDMI |
| Input Connector | (2) Type-A female HDMI |
| Output | |
| Output | (1) HDBT, (1) TO PC, (1) DC OUT |
| Output Connector | (1) RJ45, (1) Type-B USB, (1) 2-pin terminal block |
| Control | |
| Control Port | (1) FIRMWARE, (1) RS232 |
| Control Connector | (1) Micro-USB, (1) 3-pin terminal block |
| General | |
| Bandwidth | 10.2Gbps |
| HDMI Version | 1.4 |
| HDCP Version | 2.2 |
| Video Resolution | Up to 4K×2K@60Hz 4:2:0 |
| Transmission Mode | HDBaseT |
| Transmission Distance | 1080P/4K@60Hz ≤ 328ft/100m |
| Power Supply | Powered from the receiver by CATx cable. |
| Operation Temperature | -10℃ ~ +55℃ |
| Storage Temperature | -25℃ ~ +70℃ |
| Relative Humility | 10%-90% |
| Dimension (W*H*D) | 89mm x 104.5mm x 44mm |
| Net Weight | 250g |
Receiver
| Input | |
| Input | (1) HDBT, (3) USB |
| Input Connector | (1) RJ45, (3) Type-A USB |
| Output | |
| Output | (1) HDMI |
| Output Connector | (1) Type-A female HDMI |
| Control | |
| Control port | (1) FIRMWARE, (1) RS232 |
| Control Connector | (1) Micro-USB, (1) 3-pin terminal block |
| General | |
| Bandwidth | 10.2Gbps |
| HDMI Version | 1.4 |
| HDCP Version | 2.2 |
| Video Resolution | Up to 4K×2K@60Hz 4:2:0 |
| Transmission Mode | HDBaseT |
| Transmission Distance | 1080P/4K@60Hz ≤ 328ft/100m |
| AC Adapter Input Power | 100V~240V AC, 50/60Hz |
| Input Power | 24V DC 1.25A |
| Power Consumption | 23W (Max, work with the transmitter) |
| Operation Temperature | -10℃ ~ +55℃ |
| Storage Temperature | -25℃ ~ +70℃ |
| Relative Humility | 10%-90% |
| Dimension (W*H*D) | 136mm x 25.5mm x 95mm |
| Net Weight | 365g |
Panel Description
Transmitter Front Panel

- POWER LED: The LED illuminates red when power is applied.
- LINK LED: The LED illuminates green when the transmitter is successfully connected to the receiver are by a CATx cable.
- HDCP LED:
- The LED illuminates green when the HDMI signal is transmitted with HDCP.
- The LED blinks green when the HDMI signal is transmitted without HDCP.
- The LED turns off when there is no HDMI signal input.
- SOURCE SELECT: Press the button to select the next input source, or press and hold it at least 3 seconds to enable auto-switching mode.
- DISPLAY ON/OFF: Press the button to turn on/off the display.
- TO PC: Type-B USB port to connect a PC or other device needs to be controlled.
- HDMI IN 1 LED: The LED illuminates orange when the HDMI IN 1 port is connected to a source device, and it will turn green once the device is selected as input source.
- HDMI IN 1: Type-A HDMI port to connect a HDMI source.
- HDMI IN 2 LED: The LED illuminates orange when the HDMI IN 2 port is connected to a source device, and it will turn green once the device is selected as input source.
- HDMI IN 2: Type-A HDMI port to connect a HDMI source.
- RESET: Press the recessed button to reboot this unit.
- FIRMWARE: Micro-USB port for firmware upgrade.
Transmitter Rear Panel
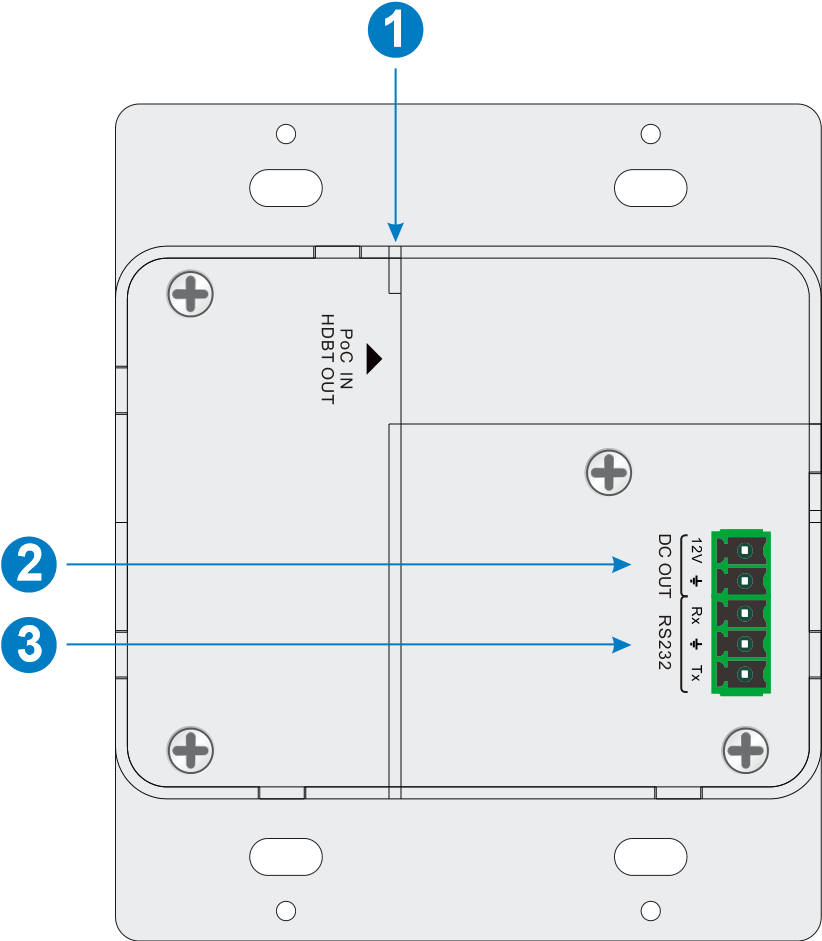
1. HDBT OUT (PoC IN): RJ45 HDBaseT output port to connect to the HDBT IN port of the receiver by a CATx cable. It supports 24V POC to enable the transmitter can be powered from receiver.
2. DC OUT: 2-pin terminal block to connect a compatible device which needs to be powered.
3. RS232: 3-pin terminal block to connect a control device (such as PC) to send RS232 command to control this unit, or to connect a third party device which needs to be controlled by RS232 pass-through
Receiver Front Panel

- POWER LED: The LED illuminates red when power is applied.
- ON LED: The LED blinks green when the receiver is in the working status.
- LINK: The LED illuminates green when the receiver is successfully connected to the transmitter are by a CATx cable.
- HDCP LED:
- The LED illuminates green when the HDMI signal is transmitted with HDCP.
- The LED blinks green when the HDMI signal is transmitted without HDCP.
- The LED turns off when there is no HDMI signal input.
- FW: Micro-USB port for firmware upgrade.
Receiver Rear Panel

1. HDMI OUT: Type-A HDMI port to connect a display.
2. HDBT IN: RJ45 HDBaseT input port to connect to the HDBT OUT port on the transmitter by a CATx cable.
3. USB IN: Three type-A USB ports to connect HID devices (e.g. mouse, keypad and so on) to control the device which is connected to the TO PC port of the transmitter.
4. RS232: 3-pin terminal block to connect a control device (such as PC), or to connect a third party device which needs to be controlled by RS232 pass-through.
5. DC 24V: Power port to connect the 24V DC power adaptor.
Connection diagram
The following diagram illustrates typical input and output connection that can be utilized with the extender.

Button Control
Signal Switching
- Press the SOURCE SELECT button to switch to next source device, and then the corresponding input LED will turn green.
- Press and hold the SOURCE SELECT button at least 3 seconds to enable auto switching mode, and it abides by the following principles:
- New input
Once a new input signal detected, the transmitter will automatically switch to this new signal.
- Signal removing
Once removing the current display signal, the transmitter will automatically switch to another active HDMI input.
- Rebooting device
The transmitter can save the last configuration before losing power. If the last switching mode is auto-switching, the transmitter will automatically enter auto switching mode once rebooted, then detect all inputs and memorize their connection status for future rebooting using. If the last selected input source is still available, the transmitter will switch to this input. Otherwise, it will switch to the first available active input source starting at HDMI IN 1.
- Exit auto-switching mode
The input source would remain the same when press and hold the SOURCE SELECT button again to exit the auto mode.
Panel Drawing
Transmitter

Receiver

Additional information
| Weight | 1.1 kg |
|---|---|
| Dimensions | 27.5 × 16.5 × 14 cm |
| WARRANTY | 1 Year Warranty |
| WHAT'S IN THE BOX | 1* Wallplate Transmitter |
Related products


Converter

